Active reconnaissance is a crucial step in ethical hacking and cybersecurity. Unlike passive reconnaissance, which relies on publicly available information, active reconnaissance involves directly interacting with the target system to gather information. This interaction can provide more detailed and accurate data but also carries a higher risk of detection. Understanding the techniques and risks associated with active reconnaissance is essential for any aspiring ethical hacker.
Understanding Active Reconnaissance
Active reconnaissance involves directly interacting with a target system to gather information. This differs significantly from passive reconnaissance, where information is gathered from publicly available sources without directly engaging the target. Active techniques can reveal more detailed information but also increase the risk of detection.
Key Principles of Active Reconnaissance
- Direct Interaction: Active reconnaissance involves sending packets, making requests, or otherwise directly interacting with the target system.
- Increased Risk of Detection: Because of the direct interaction, the target system is more likely to detect the reconnaissance activity.
- Detailed Information: Active techniques can provide more specific and accurate information compared to passive methods.
- Ethical Considerations: It’s crucial to have explicit permission before performing active reconnaissance on a target system.
Types of Information Gathered
Active reconnaissance can be used to gather various types of information, including:
- Open Ports and Services: Identifying which ports are open and which services are running on a target system.
- Operating System and Software Versions: Determining the OS and software versions to identify potential vulnerabilities.
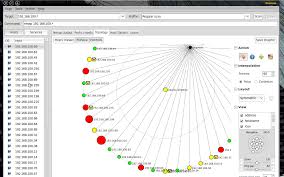
- Network Topology: Mapping out the network structure and identifying connected devices.
- Usernames and Account Information: Attempting to enumerate usernames or gather account information.
Techniques for Active Information Gathering
Several techniques can be used for active reconnaissance, each with its own advantages and disadvantages.
Port Scanning
Port scanning is a fundamental technique used to identify open ports and services on a target system. It involves sending packets to specific ports and analyzing the responses to determine their status.
TCP Connect Scan
The TCP connect scan is a basic and reliable method that establishes a full TCP connection with the target port.
How it Works:
- The attacker sends a SYN (synchronize) packet to the target port.
- If the port is open, the target responds with a SYN/ACK (synchronize/acknowledge) packet.
- The attacker completes the connection by sending an ACK (acknowledge) packet.
- The attacker then sends a RST (reset) packet to terminate the connection.
Example:
Using Nmap to perform a TCP connect scan:
nmap -sT <target_ip>
Explanation:
-sT: Specifies the TCP connect scan type.<target_ip>: The IP address of the target system.
Advantages:
- Reliable and accurate.
- Doesn’t require special privileges.
Disadvantages:
- Easily detectable by the target system.
- Slower compared to other scan types.
SYN Scan (Stealth Scan)
The SYN scan, also known as a half-open scan, is a stealthier method that doesn’t complete the TCP connection.
How it Works:
- The attacker sends a SYN packet to the target port.
- If the port is open, the target responds with a SYN/ACK packet.
- The attacker sends a RST packet to terminate the connection before it’s fully established.
Example:
Using Nmap to perform a SYN scan:
nmap -sS <target_ip>
Explanation:
-sS: Specifies the SYN scan type.<target_ip>: The IP address of the target system.
Advantages:
- Stealthier than TCP connect scan.
- Faster than TCP connect scan.
Disadvantages:
- Requires root privileges.
- Less reliable than TCP connect scan in some network conditions.
UDP Scan
UDP scan is used to identify open UDP ports on a target system. UDP (User Datagram Protocol) is a connectionless protocol, making UDP scanning more challenging than TCP scanning.
How it Works:
- The attacker sends a UDP packet to the target port.
- If the port is open, the target might not respond (or might send an application-specific response).
- If the port is closed, the target responds with an ICMP (Internet Control Message Protocol) “port unreachable” message.
Example:
Using Nmap to perform a UDP scan:
nmap -sU <target_ip>
Explanation:
-sU: Specifies the UDP scan type.<target_ip>: The IP address of the target system.
Advantages:
- Can identify open UDP ports.
Disadvantages:
- Slow and unreliable.
- Many firewalls and systems rate-limit ICMP responses, making it difficult to determine the port status.
Null, FIN, and Xmas Scans
These are advanced scanning techniques that exploit the TCP protocol to evade detection.
How they Work:
- Null Scan: Sends a TCP packet with no flags set.
- FIN Scan: Sends a TCP packet with only the FIN (finish) flag set.
- Xmas Scan: Sends a TCP packet with the FIN, PSH (push), and URG (urgent) flags set.
If the port is closed, the target should respond with an RST packet. If the port is open, the target might not respond.
Example:
Using Nmap to perform these scans:
nmap -sN <target_ip> # Null Scan
nmap -sF <target_ip> # FIN Scan
nmap -sX <target_ip> # Xmas Scan
Explanation:
-sN: Specifies the Null scan type.-sF: Specifies the FIN scan type.-sX: Specifies the Xmas scan type.<target_ip>: The IP address of the target system.
Advantages:
- Can bypass some firewalls and intrusion detection systems.
Disadvantages:
- Not reliable on all systems (especially Windows).
- Behavior varies depending on the target OS.
OS Fingerprinting
OS fingerprinting is the process of identifying the operating system running on a target system. This information is valuable because it helps identify potential vulnerabilities specific to that OS.
Active OS Fingerprinting
Active OS fingerprinting involves sending specially crafted packets to the target and analyzing the responses to infer the OS.
How it Works:
- The attacker sends a series of TCP and UDP packets with specific flags and options set.
- The target’s responses are analyzed based on known OS-specific characteristics, such as TCP window size, TTL (time-to-live) values, and TCP options.
Example:
Using Nmap to perform OS fingerprinting:
nmap -O <target_ip>
Explanation:
-O: Enables OS detection.<target_ip>: The IP address of the target system.
Advantages:
- Can accurately identify the OS.
Disadvantages:
- Requires root privileges.
- Can be inaccurate if the target system is behind a firewall or uses a non-standard TCP/IP stack.
Service Version Detection
Service version detection involves identifying the specific versions of services running on open ports. This information is crucial for identifying known vulnerabilities in those services.
How it Works:
- The attacker connects to open ports and sends service-specific probes.
- The target’s responses are analyzed to determine the service type and version.
Example:
Using Nmap to perform service version detection:
nmap -sV <target_ip>
Explanation:
-sV: Enables version detection.<target_ip>: The IP address of the target system.
Advantages:
- Provides detailed information about running services.
Disadvantages:
- Can be time-consuming.
- May not always be accurate if the service is misconfigured or uses a non-standard banner.
Banner Grabbing
Banner grabbing is a technique used to gather information about a service by connecting to it and examining the banner or welcome message it displays.
How it Works:
- The attacker connects to a specific port on the target system.
- The service running on that port typically displays a banner containing information about the service type, version, and other details.
Example:
Using Netcat to perform banner grabbing:
nc <target_ip> <port>
Explanation:
nc: The Netcat command.<target_ip>: The IP address of the target system.<port>: The port number to connect to.
Example:
nc 192.168.1.100 80
This command connects to port 80 on the target system and displays the banner, which might look something like this:
HTTP/1.1 200 OK
Server: Apache/2.4.41 (Ubuntu)
...
Advantages:
- Simple and straightforward.
- Can quickly gather information about a service.
Disadvantages:
- Services can be configured to hide or modify their banners.
- May not always provide accurate or complete information.
Traceroute
Traceroute is a network diagnostic tool used to trace the path that packets take from the attacker’s system to the target system. It can help identify network topology and potential bottlenecks.
How it Works:
- The attacker sends a series of UDP packets to the target system with increasing TTL values.
- Each router along the path decrements the TTL value.
- When the TTL reaches zero, the router sends an ICMP “time exceeded” message back to the attacker.
- By analyzing these ICMP messages, the attacker can map out the path to the target.
Example:
Using the traceroute command:
traceroute <target_ip>
Explanation:
traceroute: The traceroute command.<target_ip>: The IP address of the target system.
Advantages:
- Provides valuable information about network topology.
- Can help identify potential bottlenecks or security devices.
Disadvantages:
- Can be blocked by firewalls.
- May not always provide accurate results due to routing changes.
DNS Zone Transfer
DNS zone transfer is a process of replicating a DNS zone from one DNS server to another. If misconfigured, it can allow an attacker to obtain a complete list of hosts and IP addresses within a domain.
How it Works:
- The attacker attempts to request a zone transfer from the target DNS server using the
AXFR(Authoritative Zone Transfer) query type. - If the DNS server is misconfigured, it will provide the attacker with a complete copy of the zone file.
Example:
Using the dig command to attempt a zone transfer:
dig axfr <target_domain> @<dns_server>
Explanation:
dig: The DNS lookup utility.axfr: Specifies the AXFR query type.<target_domain>: The domain name of the target.@<dns_server>: The IP address of the DNS server.
Advantages:
- Provides a wealth of information about the target domain.
Disadvantages:
- Most DNS servers are configured to prevent unauthorized zone transfers.
- Easily detectable.
Ethical Considerations and Legal Implications
Active reconnaissance, while valuable, carries significant ethical and legal implications. It’s crucial to understand these considerations before engaging in any active reconnaissance activities.
Obtaining Permission
- Explicit Consent: Always obtain explicit, written permission from the target organization before performing any active reconnaissance.
- Scope Definition: Clearly define the scope of the reconnaissance activities, including the specific systems and networks to be tested.
- Legal Compliance: Ensure that all activities comply with local and international laws and regulations.
Minimizing Impact
- Avoid Disrupting Services: Take steps to minimize the impact of reconnaissance activities on the target system and network.
- Schedule Activities: Perform reconnaissance during off-peak hours to reduce the risk of disrupting services.
- Monitor Resources: Monitor system resources to ensure that reconnaissance activities are not causing performance issues.
Handling Sensitive Information
- Data Protection: Protect any sensitive information gathered during reconnaissance activities.
- Secure Storage: Store data securely and limit access to authorized personnel only.
- Data Disposal: Properly dispose of data when it’s no longer needed.
Practice Activities
- Port Scanning: Use Nmap to perform a TCP connect scan, SYN scan, and UDP scan on a virtual machine in your lab environment. Analyze the results and identify open ports and services.
- OS Fingerprinting: Use Nmap to perform OS fingerprinting on the same virtual machine. Compare the results with the actual OS and identify any discrepancies.
- Service Version Detection: Use Nmap to perform service version detection on the virtual machine. Identify the versions of the services running on open ports.
- Banner Grabbing: Use Netcat to connect to various ports on the virtual machine and grab the banners. Analyze the banners to gather information about the services.
- Traceroute: Use the
traceroutecommand to trace the path to a public website. Analyze the results and identify the routers along the path.
Active reconnaissance is a powerful set of techniques for gathering detailed information about a target system. By understanding the different methods, their advantages and disadvantages, and the ethical and legal considerations, you can effectively use active reconnaissance to identify vulnerabilities and improve security. The next step is to use the information gathered during reconnaissance to perform vulnerability scanning and analysis, which will be covered in the next module.


